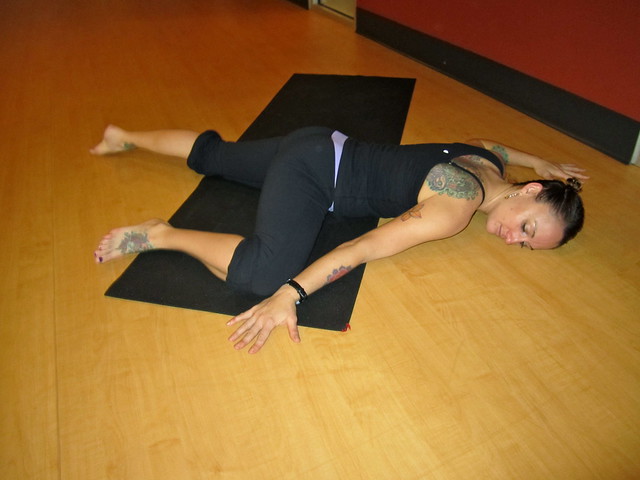
Yoga, stretching – everywhere you go people are talking about it. Maybe you don’t want to pay the money and sweat little puddles next to your 40 closest best friends, but you would like to benefit from the stretching aspect of yoga. There are many, many asanas (poses) in yoga with multiple intentions. My favorites are backbends and hip openers. As a professional ultra endurance mountain bike racer, I spend a lot of time pedaling a bike and am constantly looking for ways to take care of myself.
If you hike, ski, run, bike, walk, and/or sit at a desk, chances are that you have tight hip flexors. Hip flexors allow for forward movement and the ability to lift the leg up. They are made of three different muscles – psoas major, illiacus, and rectus femoris(part of the quads). At the end of the day, stretching is probably the last thing on your mind, but spending a few minutes in a couple of these poses will prevent injury and even boost your performance and make you feel more comfortable in your daily life.
In yoga, hip openers often coincide with emotional release. The hips stabilize us in our daily life and are said to store strong emotions of anxiety, sadness, depression, and being guarded. Whether the mind-body connection is apparent to you or not, you may be caught off guard with emotional release from time to time during and after several hip openers.
Some of the following asanas are restful and I don’t want to ever move out of the pose. Others are a little more intense, my breathing rate increases, I start to fidget, and all I want to do is move out of it.
It is absolutely okay to modify these poses. If you are too stubborn to modify, try to remember the reason of doing the pose to begin with: injury prevention and release. By brutally forcing yourself into one of these asanas when the body is not ready to go there, it can and will eventually lead to injury. It is NOT a competition.
How long should you stay in a pose? Some practices have you in the poses for minutes while others are just a few breaths. To start, aim for a minimum of 7 full breaths. Breathe in to a count of 3 and out to a count of 3. Breathe through your nose and fill your lungs all the way to the bottom and exhale all the air out through the nose at the same rate you inhaled. Breathe into the areas of tension. Conscious breaths will help the body release. Work up to staying in the poses for longer. If you have a hard time sitting still, turn on some music you like or do it with a friend or spouse.
One of my favorite yoga instructors, Tunde Borrego, agreed to be my model for the poses. I take her classes at CorePower and what shines about her classes is her bubbly energy, her happiness that brightens the room, and her ability to keep it fun. Plus, she is a handstand master and is gorgeous!
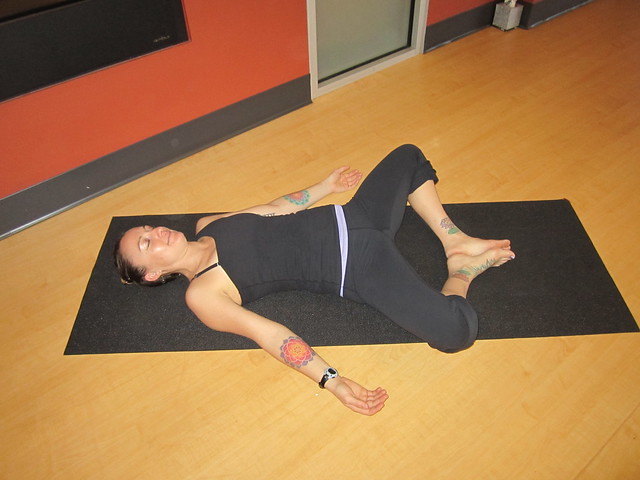
Supta Badda Konasana (Reclined Bound Angle Pose)
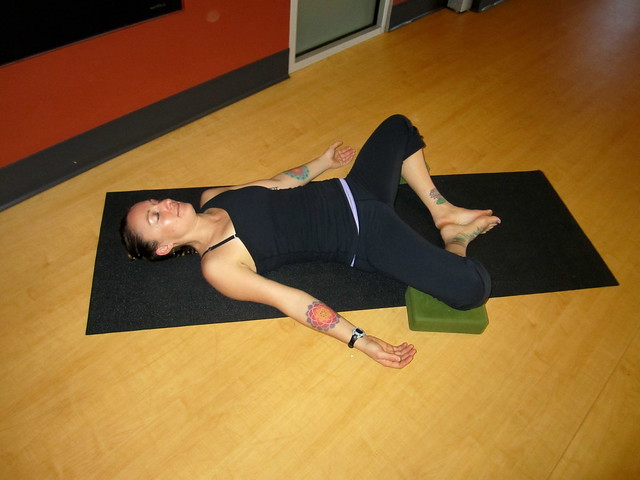
Lie down on your mat or towel. Grab your butt and pull it closer to your heels to flatten the sacrum. Push the soles of the feet together and arms out by the sides. There’s a lot you can do with your hands if you don’t want them by your sides – put one hand on the heart and one of the belly; you can place the arms overhead and push my palms together(one of my favorites), or you can even put your hands on your inner and gently encourage them to externally rotate. Your knees will be elevated off the ground and with each breath, the hips will start to release and the knees will get closer to the floor. Do not push the knees toward the floor. They are in the air because the groins are tight and forcing them down will not have a positive effect. To get out of the pose, you can bring your legs together using your leg muscles and put your feet flat on the floor. I like to use my hands to help bring my legs back together because the hip stretch is intense for me.
If the groins are so tight that this pose becomes too intense, yoga blocks can be placed under the knees. Folded blankets can also be used if yoga blocks are not available.
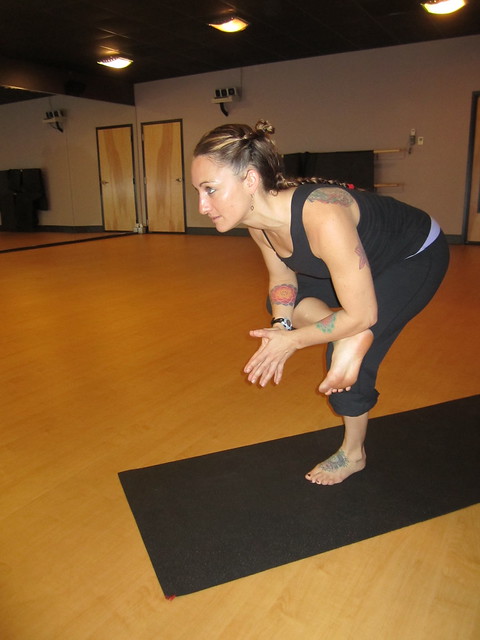
(Eka Pada Utkatasana) Figure Four
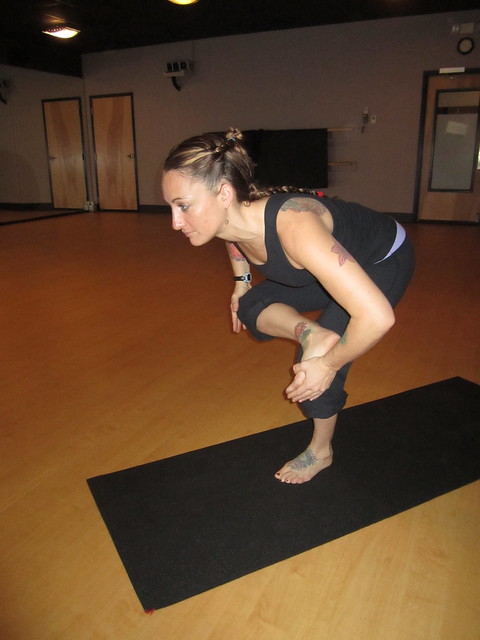
This pose involves balance and is not as restful as some of the other hip openers, but it feels great and it’s fun. Start from a standing position. Bend both knees like you are sitting back into a chair (utkatasana). Cross one of your ankles just above the opposite knee and flex the foot. Look at a point on the floor in front of you for balance and keep your gaze there. Your hands can be at the heart, or on the hips. Keep the weight in the standing heel and keep the hips level as you slowly hinge further to about 90 degrees at the standing knee. Shift the torso and chest forward. The goal is to ease the elbows to rest on the fronts of the shin where your flexed foot can almost grab your tricep and your other elbow is in front of the patella.
Repeat with the other leg.
One of my favorite teachers suggests gently pushing the palm of the hand into the bottom of the foot for a better connection and the other hand on the knee. It feels great.
Floor Figure Four or Eye of the Needle
If standing and trying to balance is too much, you can take it to the floor for a more restorative pose. Trying to balance on one leg can make the soleus muscle in the lower calf burn after standing for awhile.
Lie down on the ground with soles of the feet on the floor. Take the left ankle and rest it on top of the right knee. Flex the left foot. Bring the knees in towards the chest and lay flat on your back. Thread your left arm through the gap between the legs and bring the other hand to meet it. Clasp hands behind the right hamstring. If your hands cannot grab the leg without keeping the back flat, use a yoga strap, belt, or hand towel. Lengthen the tail bone to keep a very slight curve in the low back to also stretch the spine. Try to keep your upper spine and sacrum grounded. Breathe…
Release and do the other side.
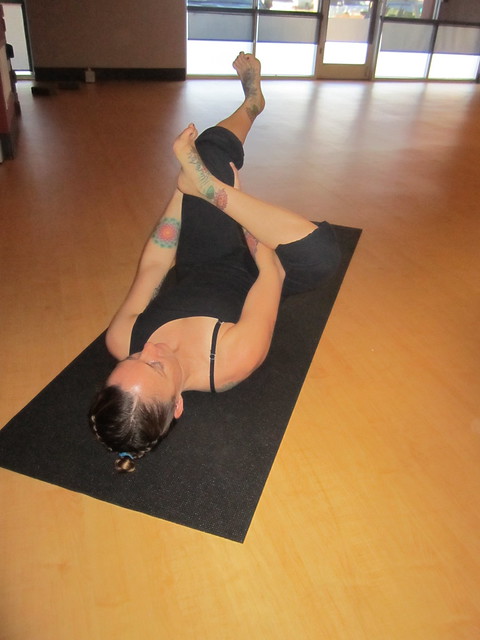
This is a great alternative to half pigeon(next poset) if you have any sort of knee pain.
Half Pigeon (Eka Pada Rajakapotasana)
For me, this one is the most intense. It’s also a huge emotional release for me. I’ve trembled and been confused why tears were rolling down my face a few times in this pose.
Start in downward facing dog. Lift your right leg off the ground, bend the knee and start bringing it foward toward your the back of your right wrist. When you can’t bring it any further forward, set the leg down. The right knee should be somewhere near the back of the right wrist. Keep the right foot flexed to protect the knee -very important. Slowly slide the left leg back and keep it straight. You can keep the toes flexed or point them on the straight leg. I prefer to keep my foot flexed.
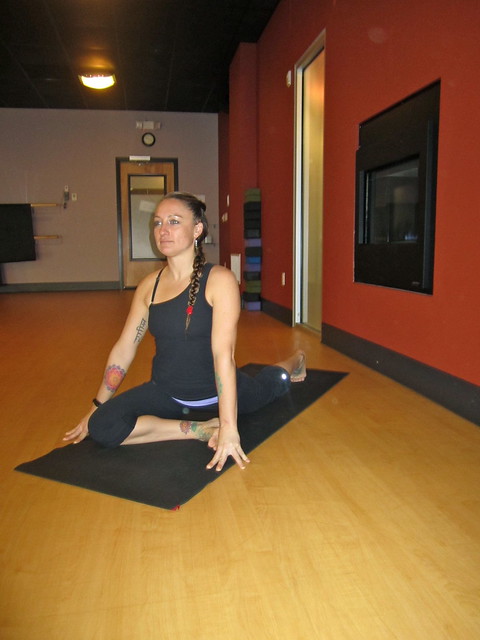
Next puff up and sit tall to level the hips before descending down to the floor. Again, flex your foot to protect the knee. If there is any knee pain at all, modify and do floor figure four. Start to reach the arms forward with palms on the floor and lower the torso. Lower down as far as you can without pain. The forearms is a good place to start.
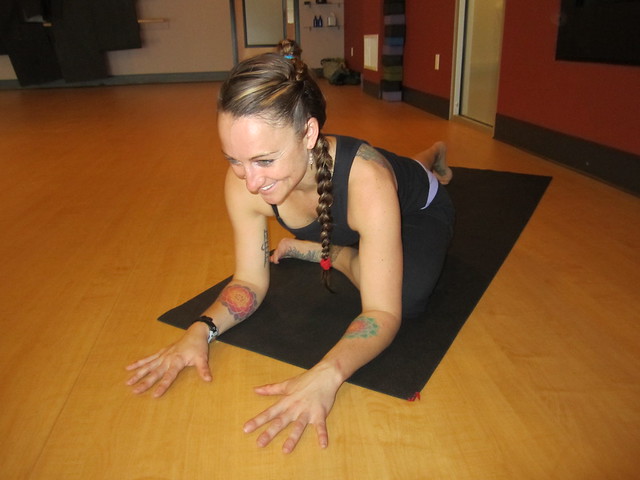
As you breathe into your hips and the groins start to release, you can walk your hands out further so the arms are straight and eventually rest the head on the ground. To come out, lift back up the way you came in, SLOWLY, and push back into down dog.
Do the other side.
There is only one way to describe this pose. INTENSE. There will be no doubt when you are in it.
Half Floor Frog
This is one of the more restful poses. I never want to move once I’m in it! Lie on your stomach. Take your right arm and extend it so the right wrist is in line with the right hip. Bend the right knee and bring it up to the height of the wrist. Turn head to the right and extend right arm back to shoulder height. Bend at the right elbow if desired.
Switch and do the other side.
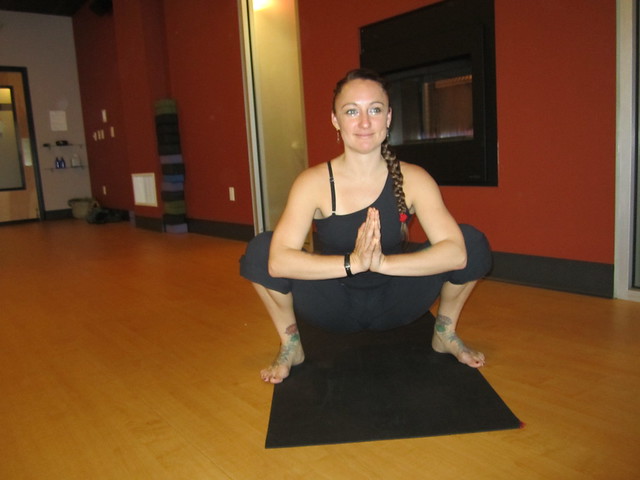
Standing Frog
From standing, squat down slowly as the knees point to opposite ends of the room. Put hands in prayer position at the heart and squat down until your elbows connect with your inner knees. For a more intense stretch, gently push elbows into knees. Drop shoulders down the back and hollow out the armpits.
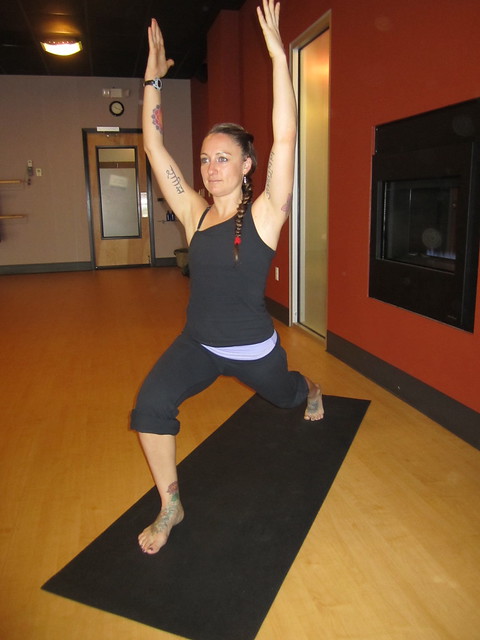
Crescent Lunge (Anjaneyasana)
This one gets into the legs a little more, but feels great in a different part of the hip than some of the other poses. Start with hands on the hips from a standing position, feet hip width apart. Step the right foot forward and bend the front knee to 90 degrees. Keep the left leg straight, but lift the heel off the floor so you’re on the ball of your foot. Keep the hips square. If they are not square, you may need to step your right leg out a little more. Put a bend in the left knee and focus on pushing the left hip forward to the front of the room, tucking your tailbone. Lift arms overhead, fingers bright, and drop the shoulders down the back. Draw lower ribs in. Breathe… If this is too much for your legs, you may drop the back knee to the floor. You may also go into low lunge by hinging the torso forward and resting the hands on the ground and chest just above the bent knee.
Switch and do the other side.
Notice she has her legs hip width apart.
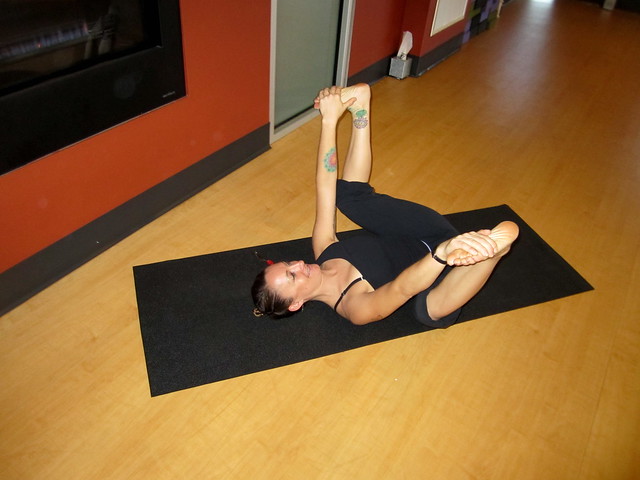
Happy Baby (Ananda Balasana)
Lie down on your back. Bend knees and bring them up towards your armpits. The goal is to try to keep the sacrum and back flat on the floor. The grip you choose will help. Either grab your feet from the outside, grab from the inside (as pictured) or take your index and middle finger(peace fingers) and grab your big toes with wrists facing one another. Pull down gently drawing the knees toward the floor for more stretch. Grabbing the big toes with the peace fingers is the easiest for me. You can gently sway side to side if that’s comfortable.
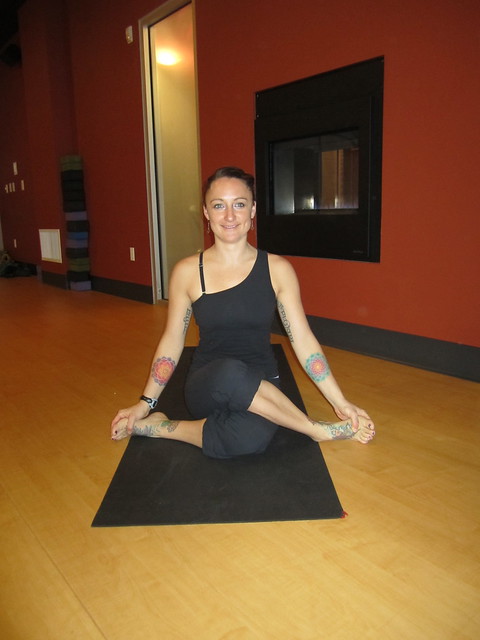
Cow Face
This one can be intense in the outer hips. Get on your hands and knees(tabletop position) Cross right knee in front of the left knee. Try to sit back so your butt touches the ground, hands on the feet or ankles.
A good modification for this pose, particularly if you have tight hips is to use a blanket, towel, or block under your butt so your butt rests on the prop if you can’t make it to the floor.
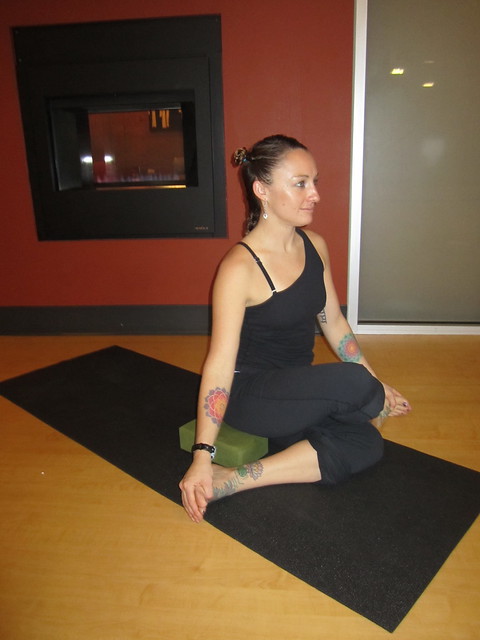
If you do make it to the floor, but one hip is higher than the other, modify but putting the bock or blanket under the elevated hip. Don’t forget to switch and do the other side.
Alright! That’s a lot of info for you. Start with trying one new pose a day, and maybe work into doing 3 poses a day and start reaping the benefits of more flexible hips!!
If you’re interested in yoga and cycling, check out the rest of my blog entries in Alpine Adventures!
Or for more fun, follow me on twitter.


